LINE FOLLOWER PART 2: MOTOR DRIVER

LINE FOLLOWER PART 2: MOTOR DRIVER

Coming to the second part of our discussion and thats the motor driver. So the motor driver is basically an electronic circuit that drives/control the motor by controlling the voltage across the terminal. It can move the motor(DC motors) back and forth with a variable speed range.

TYPES OF MOTOR DRIVER

1. L293D BASED
* It is cheaper,lesser components, does not require a heat sink.
Description
* 600mA OUTPUT CURRENT CAPABILITY PER CHANNEL
* 1.2A PEAK OUTPUT CURRENT (non repetitive) PER
* CHANNEL ENABLE FACILITY
* OVER TEMPERATURE PROTECTION
* LOGICAL "0" INPUT VOLTAGE UP TO 1.5 V (HIGH NOISE IMMUNITY)


2.L298D BASED  
* Its comparatively costlier,needs heat sink, more current carrying capacity.
Description
The LN298 is a high voltage, high current, dual full-bridge motor driver designed to accept standard TTL logic levels and drive inductive loads such as relays, solenoids, DC and stepping motors.
- Operating supply voltage of up to 46V
- 4.5-7VDC logic supply voltage
- Total DC current of up to 4A
- Over-temperature protection
                                                      - Logical ‘0’ input up to 1.5V (high-noise immunity)
PINS LAYOUT IN MOTOR DRIVERS
Power pins- through which power is feeded in. These are VCC+ and GND- . 12V input is given to it.
Motor outputs pins- outputs to the motors are given through this.
ENA, ENB(enable A,B) - It works as enable to circuit and also speed control for the motors. It regulates the voltage from 0-12V with logical signal of 0-5V input from arduino.
Pins A1,A2 and B1,B2- these and used for controlling the direction of the motor.
A1
A2
ACTION
LOW
LOW
NO ACTION
LOW
HIGH
FORWARD
HIGH
LOW
BACKWARD
HIGH
HIGH
STOP

Similar action can be used for motor B.

CHOICE OF MOTOR
BO MOTOR STRAIGHT
BO MOTOR L-SHAPED
Centre shaft DC geared motor or plastic motor (B.O.motor) works fine with line follower.
 THANK YOU FOR READING THE BLOG.....

LINE FOLLOWER: PART 1 - IR SENSORS

The line follower can be divided into 3 subparts.
They are-
1. Sensors
2. Motor and Driver
3. Microcontroller
In this blog only sensors will be discussed.

LINE FOLLOWER: PART 1 - IR SENSORS

Sensor is like an eye for line following robot and through this digital signal is fed to the arduino.
Sensor are of two kinds-
1. Analog (gives signal between the value 0-1023 for 0-5V input)
2. Digital (gives signal of either 0 or 1)

Digital sensors are prefered because of better sensitivity and lesser programming. The components of digital sensors are
1. IR Sender and Receiver
2. LM358 IC 2 IR transmitter and receiver pair
3. Resistors of the range of kilo ohms
4. Variable resistors.
5. LED (Light Emitting Diode).
6. PCBs and soldering Equipments 

WORKING PRINCIPLE
When the ir rays from ir sender are reflected from the object and fall on the IR receiver, it changes its state of open to close, behaving as a switch.
It offers minimum resistance when ir rays fall on it.


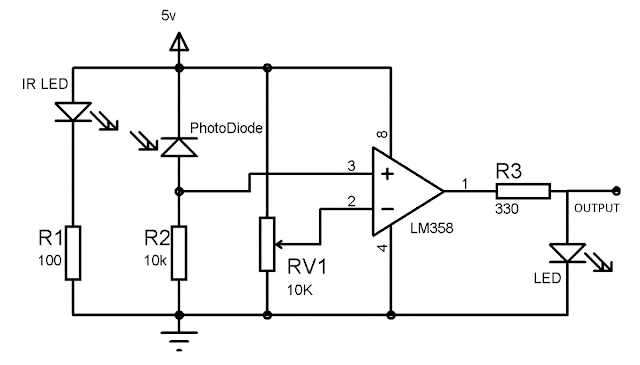
JOB OF LM358 IC

The abbreviation LM358 indicates an 8-pin integrated circuit, comprising two operational amplifiers at low power. The LM358 is designed for general use as amplifiers, high-pass filters, low band pass filters, and analog adders.

It is used as a comparator here. It compares between the reference 
voltage with the signal from the ir receiver, if signal is greater than reference then out put will be 1 or digital HIGH. else it will be 0 or digital LOW.

CIRCUIT FOR SENSOR MODULE
If you are interested of building one sensor at your own. but its better to buy these.
MODULES YOU BUY ONLINE
These can be of one sensor or sensor array
SINGLE SENSOR MODULE
MULTI SENSOR MODULE


It's better to use multiple sensors for better accuracy. You will atleast need 2 single sensor for operation. SIX sensor are better if you are using arduino UNO,you can connect them in analog pins.
If you are using MEGA no pin nos is concerned.

The distance sensing capability can be adjusted by using the potentiometer spinning it in appropriate direction.Any sensor module must have a VCC+ and GND- pin with them and output pins of equal numbers of sensors. 5V supply to the sensor is quite good for the operation. If you are using separate source for sensor you should make the ground common with arduino's ground.

Thanks for reading my blog........


How to burnt Arduino and repaired it.

It is quite harsh and sad if your arduino stops working. It a heart breaking experience because it's your project's heart. I am discussing how one can burnt arduino.
Can it be repairable !!! Yes or No?? and if yes HOW!!!


How to break/burn/damage Arduino.

1. Overvoltage 

Though arduino have voltage regulator it works between 5-20V and 7-12 V be the desirable ones. Giving more than that is risky.

2. Shorting Input/output pins or overvoltage them.

     I was once working with a motor driver circuit and one of 12v terminal got connected with input and that damage the AtMega328 IC. Later I was able to replace that one and made my arduino work again.From my experience I suggest that you never short you input or put high volts through them.

3. Unwanted connections

     Recently I damaged my arduino by an unconventional way that is unrepairable. I had a open wire of 12v that came contact with 6pins of FDTI (don't know particular).So this result in damaging the FDTI permanently and the arduino board is shorted. Atmega chip was damaged and when I tried replacing it with another chip....I lost both of them. I have no idea how to repair.

4. Over load operations 

     Another case its not damaged actually,it happen when u tried to switch on and after working a bit it stop suddenly. It may be the supply isn't up to the demand of load connected to arduino. This can be resolved using power source having more ampere power.

So up above are the cases one can damage arduino. Now its repairing time.
Make sure if it is repairable...
First remove the atmega chip from board. For nano,mega and other non removable chip users...RIP...
For UNO users remove it. Then plug it up and see if the led of rx/tx and pin-13 blink once or more. If yes then your board is healthy. Replace the Atmega chip with new one with arduino UNO bootloader. It is available in online shopping sites. Most of the Atmega 328 used in arduino comes with uno bootloader. If you can't get a chip I can help you in later blog if I have any requests.
If the leds don't blink, or stays on..your board is damaged... RIP...
Hope You liked it. Like my blog.
"Never lose hope when you fail, those who don't fail haven't tried anything new."
    

Portable emergency mobile charger

Portable emergency mobile charger

KISS is a better way to build things. I mean Keep It Simple Stupid(KISS). In this post I will build a simple Mobile charger using a DC geared motor.

Things you needed:

1. DC geared motor(100 or 150 rpm)
2. 5V voltage regulator(7805 IC)
3. USB female connector


Tools: soldering things, hot glue gun, wires, plastic case


CIRCUIT DIAGRAM:


When the shaft of dc motor is rotated at suitable speed it generate about 5-12 V. The voltage regulator here works as constant voltage source to mobile device as mobile and many other electronic devices run at contant 5V DC. So any unwanted higher value is cut off by 7805 IC.

SO MAKE IT HAPPEN....

1. make the connections
2. make place for the motor
3. make place for usb_female and stick it with hot glue.

4. build a handle for rotating the shaft
5. Finally bring all together and test if your phone charges.

Thank you for reading this blog. Hope you have enjoyed it.


First Blink Arduino ;)

   HOW TO BLINK A LED ON ARDUINO;   

Before starting I can say that I am a beginner in Arduino Projects but I am quite fascinated about all these stuffs.

"www.arduino.cc" --This is the official website that will be helpful to you if you want to learn all kind of arduino stuffs.


Arduino Uno R3
Before start we need to have following things.

1- Arduino Uno Board(or any other arduino board may      be helpful)
2- Serial cable uno-PC connector
3- led (or there is an in built led in the board        itself)
4- Arduino ide software(download link


It is the simplest code for the beginner to begin with.

-Install the arduino ide software, its free but you may donate if you have a lot of money.

-Then connect the arduino to the PC using the cable.the PC will detect the Arduino uno if you are using win7 or more. For xp or less users you may install the drivers.

-then open the software open file>examples>basic>blink
-compile the code.
-open tools>board>arduino UNO(or any other board you are using)
-open tools>ports>"com 3"(or any other port that arduino is connected)
- then dump or Upload the code using "=>" right arrow key on the top.
-Wait till the code is Uploaded.
- Finally you can see a small light blinking on the board.

CONGRATES !!!!
You have done your first arduino code.
And many more to come.